Drops is a powerful way to create and collect on Foundation. Creators deploy a smart contract that represents their drop, and collectors can mint NFTs from the drop page. Learn more in our Drops FAQ.
In the following guides, we’ll walk you through what to expect with your drop on Foundation. These articles walk through the three steps you'll take to do a drop on Foundation:
Step 2: Schedule your Fixed or Dynamic Price drop
You don't need to have your entire collection of assets ready before you get started with your drop! By breaking the flow into 3 distinct steps, we've made it easy for you to get started as you're working on your drop.
Drops fees
Drops is an advanced tool for creators who want to take their work to the next level. There is a 0.0008 ETH marketplace fee for Drops in our primary market (prior to April 2nd, 2024 the Drops primary fee will remain 15%). Secondary sales on Foundation marketplace have a 5% fee, which is the same for all NFTs on Foundation.
Step 1: Create a drop
When you’re ready to create a drop, the first step is to create the drop smart contract.
What you’ll need
- A name and symbol
- The number of NFTs in your drop
- A pre-reveal asset
- Choose a chain to deploy on
Deploy the drop contract
Below, you'll find more details for each aspect of the contract setup.
- Contract Name: Add a contract name. This contract name will also be the name of the drop itself.
- Drop symbol: The drop symbol acts as the smart contract token name on the blockchain. If your contract name is "Support" you might use something like "SUP" for the symbol.
- Token Supply: This will be your drop's fixed amount of NFTs! This can be any number up to 10,000. Please remember that this number can’t be changed after you deploy the drop contract.
- Pick a chain: You now have the choice between Ethereum and Base, an L2 chain. Gas fees on Base are lighter for creators, and the collectors of your drop.
- Optional: If your drop is a collaboration between you and one or more additional parties, you can set up a split to define how you’d like to divide the earnings. Splits are applied in perpetuity, meaning that the earnings will be divided for the initial mints and any subsequent royalties received on the secondary market.
Create a split
Adding a split to your drop allows you to share earnings with up to 4 wallets. This feature allows you to set a share percentage for each participant, which determines how much each individual will earn on primary sales and royalties from secondary sales.
If you’d like to create a split within your drop, follow these steps:
Toggle the “Create a split” setting.

Enter the wallet addresses for the split recipients.
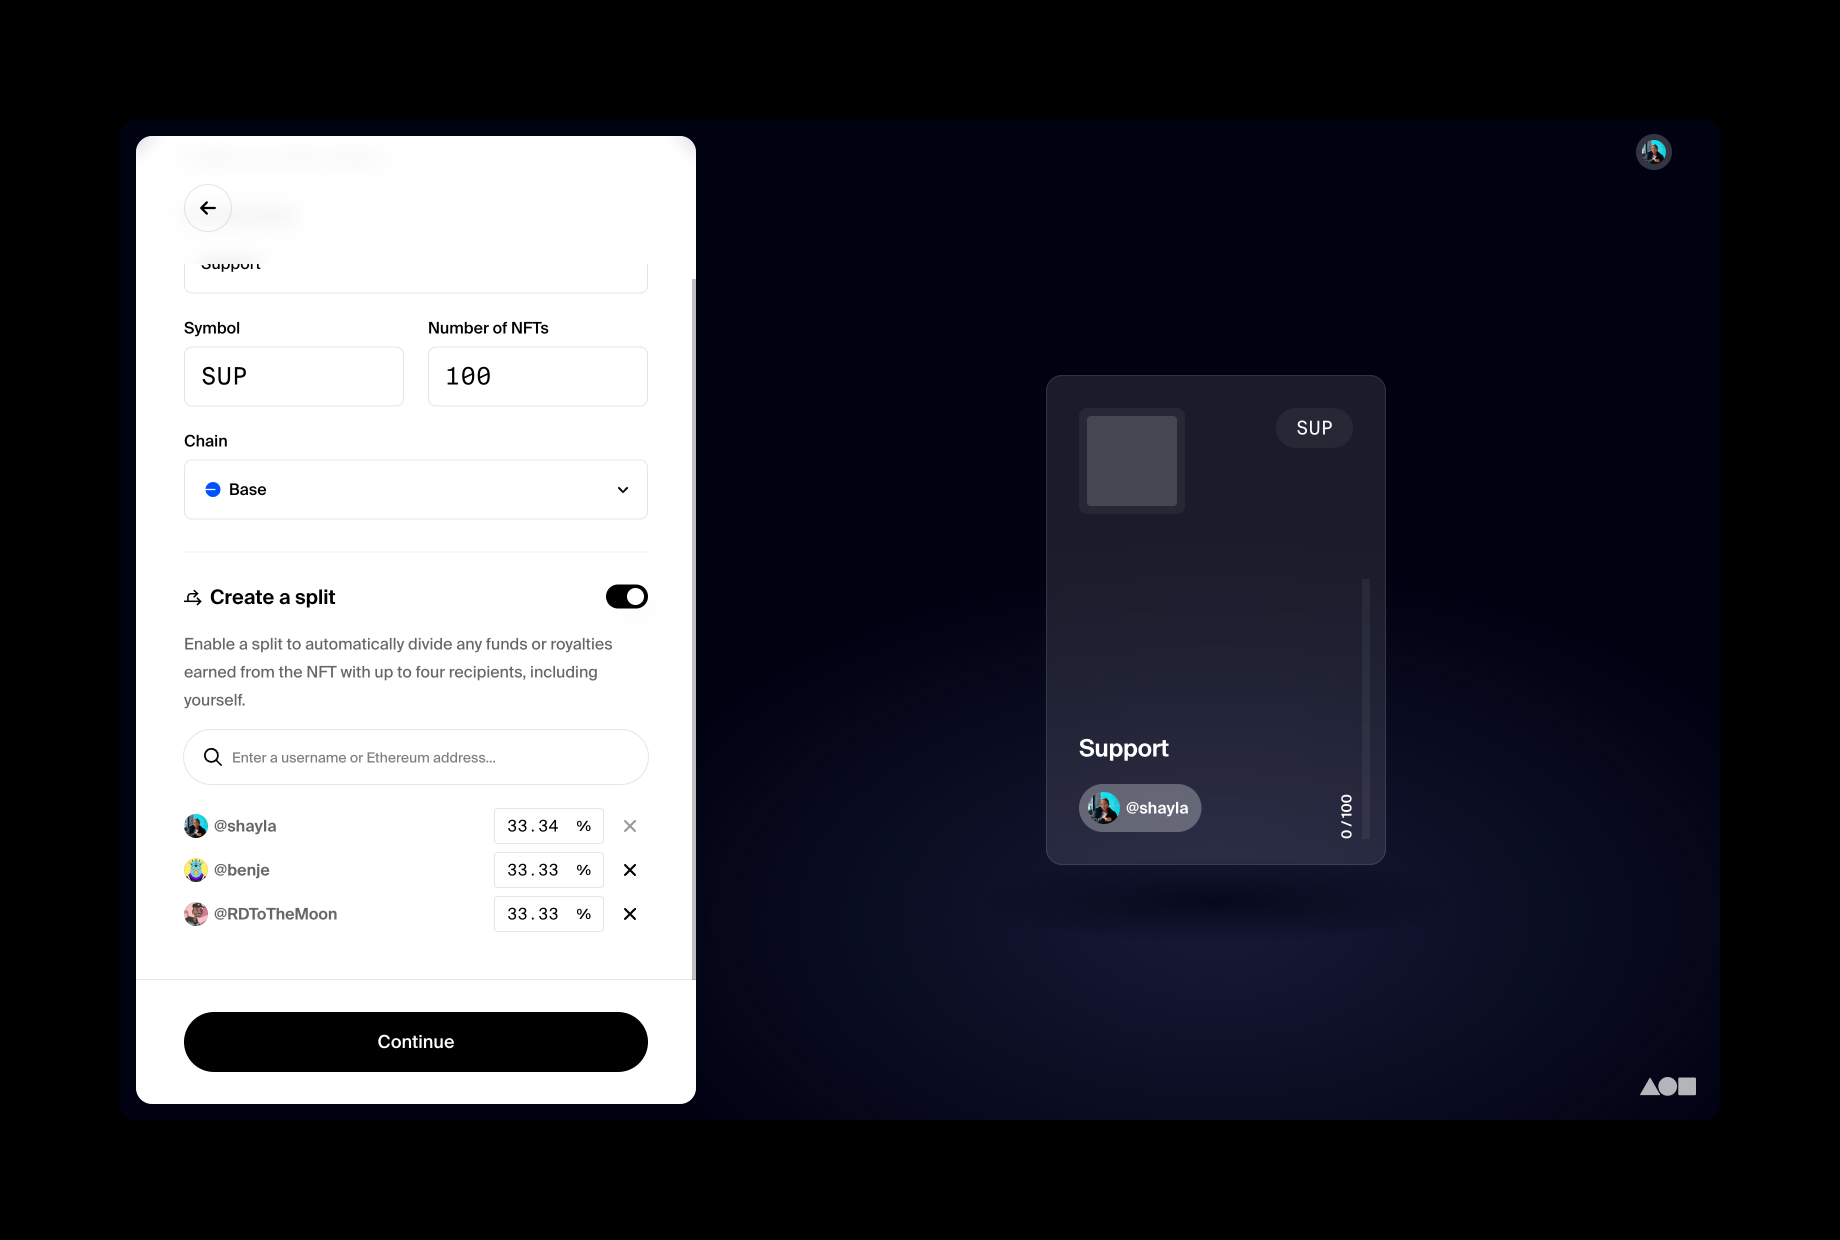
Set each recipient’s share percentage to add up to a total of 100%.
Click Continue.
Once deployed, a split can’t be changed. It is forever recorded on the blockchain, and any desired changes will require starting this process again.
Add the pre-reveal asset
We've included a reveal mechanism to preserve the surprise and fairness with Drops. This reveal mechanism ensures that everyone gets an equal chance at getting a unique NFT. Your pre-reveal image will initially be used to represent all NFTs in your drop. We recommend designing a unique asset that can promote the entire drop.
The pre-reveal images image must be a JPEG, PNG, or GIF. The pre-reveal dimensions should ideally be a square, and at least 640x640px. Please refer to Foundation's file size limits in the technical specs article.
* Please keep your revealed final assets in mind: step 3: reveal your drop. For the unique revealed assets, Foundation supports JPG, PNG, SVG, MP4 + MOV files. Please refer to Foundation's file size limits in the technical specs article.
- Some creators have animated GIFs or logos that hint at the final assets. Some have even played with the idea of the pre-reveal image being a sealed package that can be unwrapped once the final reveal happens.
Please ensure there are no spelling errors and that your files meet our specs above before Confirming onchain and deploying the contract. After the contract is deployed, the contract name, drop symbol, token supply, and pre-reveal asset can’t be changed. Once everything looks good, you can proceed to create your drop.
If you deploy the contract and realize there's a mistake, you may also self-destruct it by navigating to the drop and selecting the three dots near the top of the drop page.
- Click Confirm onchain.
- Approve the gas fee: A message will appear within your connected wallet for you to approve the gas fee to deploy your drop smart contract to the blockchain.
Gas fees are the cost of interacting with the blockchain and are not set or collected by Foundation.
Once the drop is created, you’ll have successfully deployed your Drops contract and be directed to the next step—scheduling your drop. To continue to the next step, follow along to step 2: schedule your drop.